Shoulder pain is a frequent issue that affects stroke survivors. It may impact their quality of life and impede rehabilitation.
Research suggests that up to 70% of stroke patients experience shoulder pain at some point during their recovery.
Several factors can cause this pain.
In this article, we'll talk about what causes shoulder pain after a stroke and what the best ways to treat it are. Additionally, we'll also explain how to keep it from happening in the first place.
What Is The Reason For Shoulder Pain After Stroke?
In most cases, the reason for shoulder pain after stroke are the shoulder injuries that ensue after the event.
These injuries can happen immediately after the stroke, due to the shoulder muscles being weak. However, there are also some other causes which aren’t injuries.
That being said, the cause of shoulder pain after a stroke is thought to be multifactorial and complex. One condition can lead to another, and sometimes there may be more than one cause.
Here’s a brief overview of the mechanism behind the pain and the specific conditions which are more commonly reported:
- Low tone of muscles
The primary cause why stroke patients experience shoulder pain is muscle weakness and loss of sensation. These then also lead to loss of muscle control.
This weakness and loss of control can cause imbalances in the soft tissues around the shoulder, altering the mechanics of the joint and making it more prone to injury. Some of the injuries low tone of muscles can lead to are the following:
- Shoulder subluxation
Shoulder subluxation is a common problem for people who have had a stroke. Although the prevalence varies, studies suggest it occurs in 17% to 81% of all patients.
During the first three weeks after the stroke, the shoulder joint may lose its mechanical integrity and stability. That’s because the muscles around the shoulder joint are weak.
And due to how the shoulder joint is built, during this phase, the shoulder can easily slip out of place. This is known as shoulder subluxation.
Prevention of shoulder subluxation is critical, as it can lead to contractures and permanent damage to the muscles, ligaments, joint capsules, nerves, and blood vessels. - Frozen shoulder
A frozen shoulder is a medical condition that makes the shoulder stiff and difficult to move. The tissue surrounding the shoulder joint becomes dense and constrictive. Another term for it is “adhesive capsulitis.”
Frozen shoulder is another common complication among stroke patients, leading to shoulder pain. In a 2013 study, among 106 patients suffering a stroke, 56.6% developed a frozen shoulder.
Besides the low tone of muscles, the cause of frozen shoulder in people who have had a stroke is complicated and not fully understood. But there are some theories, such as:
- Immobilization. When a joint is immobile for a long time, the joint capsule and the tissues around it can stiffen and thicken. This is also called a contracture, as we’ll now see. All these can then lead to adhesive capsulitis.
- Inflammatory mediators. After a stroke, the body makes more inflammatory by-products. These can cause joint inflammation and scar tissue and adhesions to form in the shoulder capsule.
- Age and other health problems: Getting frozen shoulder after a stroke is more likely if you are older and have other health problems, like diabetes or high blood pressure.
- Immobilization. When a joint is immobile for a long time, the joint capsule and the tissues around it can stiffen and thicken. This is also called a contracture, as we’ll now see. All these can then lead to adhesive capsulitis.
- Muscle Pinch (Impingement)
Shoulder impingement happens when a tendon (a band of tissue) in your shoulder rubs or catches on nearby tissue and bone when you lift your arm.
In stroke patients, this commonly happens when using an overhead pulley, for example. (That’s why current guidelines prohibit the use of overhead pulleys in stroke patients).
In a recent study conducted in Thailand, impingement was identified as the cause of pain in 57.8% of the patients with shoulder pain.
- Shoulder subluxation
- Spasticity and contractures
Spasticity is a common problem after a stroke that makes the muscles stiff or rigid.
After a stroke, the injury to the brain can cause muscles to contract involuntarily. That especially happens when trying to use the affected shoulder. Because the muscle can't move as far as it normally would, the tendons and other soft tissues around it can tighten or shrink. This is called a contracture.
Spasticity can greatly impact a person's quality of life by making it hard to do everyday things. If you don't treat spasticity, the muscle can contract (“freeze”) in an odd position, causing a frozen shoulder, which we mentioned earlier. - Neuropathic pain
Another name for this condition is “central post-stroke pain.”
This condition is caused by damage to the nerve pathways in the brain that process pain, not by an injury.
The brain is used to getting normal sensory inputs, and when it doesn't, the brain itself makes painful sensations.
CPSP can make the skin feel like it's burning, stabbing, prickling, or numb. It mostly happens on the side of the body that was hurt by the stroke. Most of the time, this pain worsens when touching or moving the area or putting water on it. CPSP can happen days, months, or even years after a stroke.
It happens in roughly 11% of stroke patients, although this number can be higher in some stroke subtypes.
This condition happens more frequently in those patients with more pronounced loss of sensation.
How Do You Relieve Shoulder Pain After A Stroke?
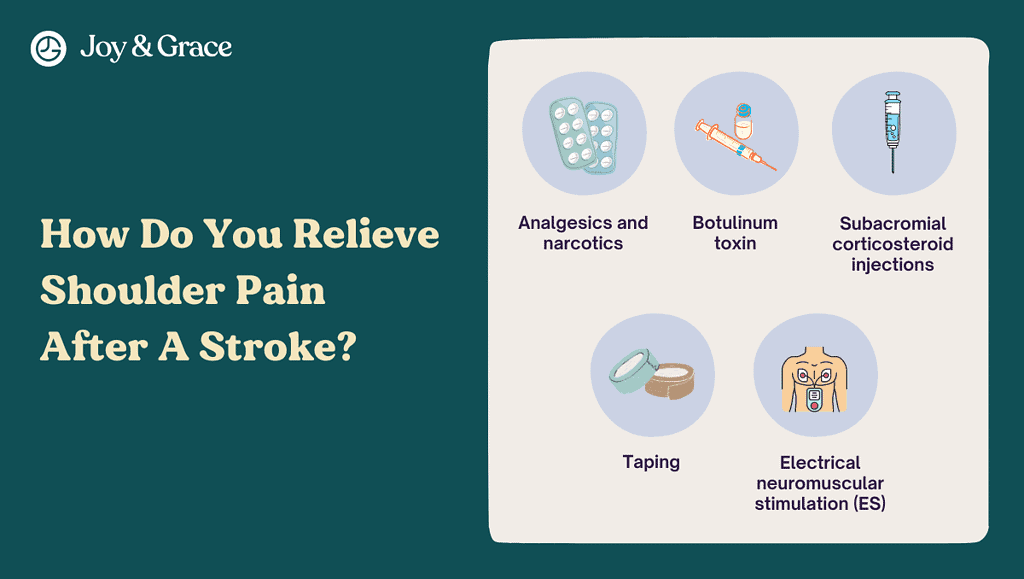
There are various medication treatments available for shoulder pain after a stroke. However, shoulder pain relief only via medication is not the primary goal of pain management after a stroke.
The best way to relieve shoulder pain after a stroke is to actually try to prevent it from happening. Part of the prevention techniques is strengthening your shoulder. All these are done with injury prevention (especially shoulder subluxation) in mind.
Let’s review some pain relief management options first and then discuss prevention techniques and shoulder exercises.
Pain relief medication for shoulder pain after stroke
- Analgesics and narcotics
Analgesics (such as ibuprofen or narcotics) can be considered for pain relief on an individual case basis. - Botulinum toxin
This treatment is mainly used to treat spasticity.
Botulinum toxin type A could be injected straight into your muscle. Botox, Dysport, and Xeomin are common brand names for this treatment. Botulinum toxin type A works by stopping nerves from sending signals to muscles. This makes muscles less able to contract and help straighten out your shoulder.
Botulinum toxin type A usually works to relax muscles for about three months, and you shouldn't notice any changes in how your muscles feel.
For the treatment to work, it should be followed by more rehabilitation, like physical therapy, or other treatments, like splinting or casting, to keep the muscle's range of motion. - Subacromial corticosteroid injections
Corticosteroid injections are mainly used if impingement is the cause of shoulder pain. However, doctors can also use them in people with other inflammatory causes of post-stroke shoulder pain.
Studies suggest corticosteroid injections can help relieve the pain for up to 12 weeks afterward. - Taping
It has been demonstrated that taping the affected shoulder lowers discomfort. - Electrical neuromuscular stimulation (ES)
This method is done by applying an electrical current to the skin. This stimulates nerves and muscle fibers, which may improve muscle tone and strength and reduce pain.
Some studies suggest this method relieves shoulder stiffness and reduces pain.
How Do You Prevent Shoulder Pain After A Stroke?
As we said earlier, shoulder injuries are the most common cause of shoulder pain after a stroke. Hence, prevention of shoulder injuries is critical.
We are now aware that the shoulder is fragile after a stroke. It can get injured very easily. And by very easily, we mean even by sleeping in an incorrect position.
That’s why after a stroke, it's important to have a trained medical professional show you how to position your body and upper limb safely.
Usually, a physical or occupational therapist will give this kind of advice. Your therapist can also show your family and friends how to position you correctly so they can help you.
There’s clear evidence that this helps the prevention of shoulder injuries.
Despite that, we’ve compiled a quick guide about proper body positioning and support after a stroke. Let’s review some of the key points of shoulder injury prevention.
Joint Protection
To avoid or reduce shoulder pain and injuries, you should use joint protection techniques throughout the early or flaccid healing period.
Supporting And Putting The Shoulder In The Proper Position For Rest
- Positioning yourself while on your back:
You should put pillows behind the hip, weaker arm, shoulder, and head. You should also place the feet in a neutral stance. (4th figure.)
You should place one or two pillows under the head, under the weaker shoulder for comfort, under the stronger leg, and extend the weaker leg straight out.
Moreover, pillows should be positioned at the body's front and back.
- Positioning while lying on the stronger side:
The weaker shoulder should be positioned forward and supported by pillows, with one or two additional pillows under the head.
Pillows should also be positioned behind the weaker leg. (figure A.) - Sitting upright position:
You should be positioned in the middle of the wheelchair or chair with your arms forward with pillows on your lap or a table.
You should bend your knees directly above the feet, with feet flat on the floor or footrests. (figure C.) - Sitting up in bed:
It is only advised for brief periods; sitting on a chair as quickly as feasible is preferable.
Legs should be pleasantly stretched, and arms should be propped up on pillows on either side of the torso. (figure E.) - During transfers:
Proper positioning of the weaker shoulder and upper arm is essential when moving from one chair to another or a bed.
During transfers, the weaker arm should always be supported, and no one should pull on it because it can cause a shoulder dislocation.
You might find it easier to get out of bed by putting a bar next to your bed that you can use. That will help you push yourself up.
Devices You Can Use For Positioning
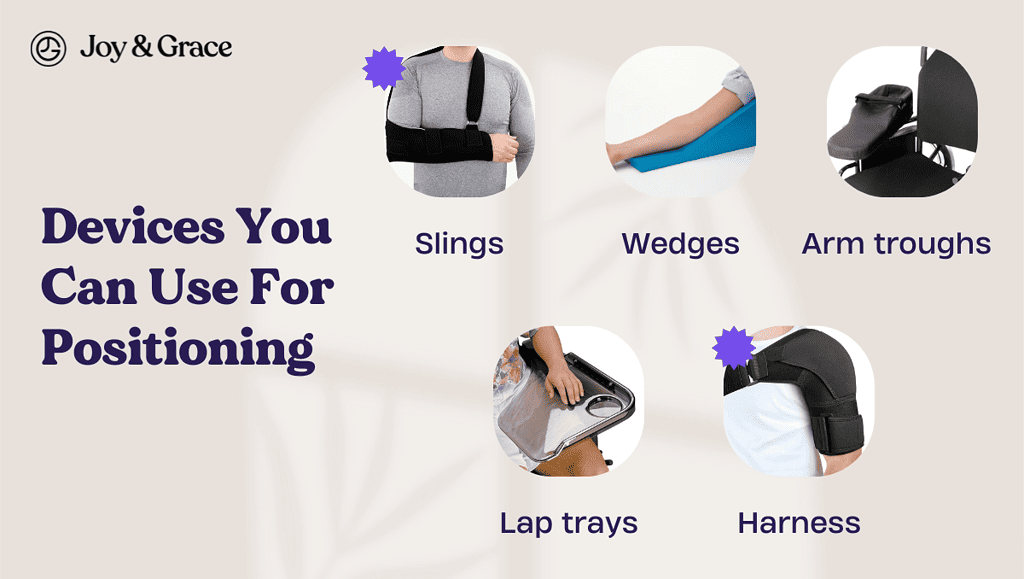
Although with limited evidence, studies suggest that using certain types of slings and other supporting devices significantly reduces the chances of a shoulder injury.
- Slings
You can use different slings after a stroke to support your weaker arm while you stand or move from one place to another. Slings can help prevent shoulder subluxation. However, slings are only recommended at the very beginning after the stroke, when the shoulder is entirely flaccid. - Wedges
Wedges are under your knees when you sit down, so you don't slide around in the chair. - Lap Trays
Lap trays are placed on your lap and are attached to the armrest of a wheelchair. You can then put your weaker arm on the tray. - Arm troughs
Arm troughs are built into the armrests of wheelchairs so that your weaker arm doesn't hang off the side. You can also add a strap to the trough to support it. - Harness
Harnesses are used for the weaker shoulder. They are often adjustable and have Velcro to hold them in place. A harness supports the shoulder by going over the weaker shoulder and around the back of the neck to the stronger arm.
How Can I Strengthen My Shoulder After A Stroke?
After a stroke, it may be hard to get your shoulder to how it was before.
Initially, it's easier to move your arm with help, either by holding it with your stronger arm or by having a helper assist you.
When starting an exercise routine, lying on your strong side (with your weak side on top) or your back may be more manageable.
Throughout the day, think about using your arm and attempt to use it as much as you can. Once you get some movement back in your arm, try to do things like washing, putting on clothes, and doing housework with both arms.
Be aware of how your arm might feel when you try to do things that might be too hard. If your arm gets tighter, stop and stretch your muscles before you try again.
Beginner Exercises
If needed, your strong hand can assist, or somebody else can support and guide your weak arm.
Most of these exercises can be found in a document compiled by the New Zealand Stroke Foundation. We will cite the pages where the exercises are found, so you can see a visual guide to each exercise below.
1. Exercises you can do while lying On Your Strong Side (page 37)
- Your helper supports your weak arm throughout
- Reach forward
2. Exercises while Lying on your back (page 38, figure 1)
- Put your hands together and try to reach toward the ceiling. If your shoulders hurt, don't go past 90 degrees
3. Exercises while lying on your back - with a helper
- Helper-assisted resisting exercise (page 38, figure 2)
- Have a helper on your strong side of the body.
- With your arms bent, push both elbows away from your body.
- Helper resists the strong side to urge the weak side to move.
- Shoulder shrugging(page 38, figure 2)
- Try to bring both shoulders up to your ears. This can also be done sitting down.
- Try to bring both shoulders up to your ears. This can also be done sitting down.
4. Exercises while Standing (page 39, figure 1)
- Put both of your hands flat on a table.
- Put your weight on your weak arm and hand while keeping your elbow straight.
- Move your weight forward while keeping your hand flat on the table. Don't touch your thumb with your fingers.
This is a good way to keep your hand from getting stiff. Your weak arm may need help from you or your helper.
Advanced Exercises
These exercises should be done when you have enough control to do most of the movement without help.
1. Advanced exercises while lying on your back (page 39, figure 2 and 3)
- Extend your weak arm up toward the ceiling. Move your straight arm a short distance in different directions, such as up, down, or to the side.
- Then, bend your elbow and touch your head with your hand. Afterward, straighten your arm and hold it straight.
- Then move your hand onto the opposite shoulder.
2. Advanced exercises while sitting
- Weight Bearing Shoulder Lean
- From a sitting position, put your hurt arm about a foot away from your body and use it to prop yourself up. Then move toward it.
- If it doesn’t cause pain, stay there for about 10 seconds and feel the stretch. Stop the stretch right away if it hurts.
- After about 10 seconds, put your other arm out next to you so both arms can support you. Then rock from side to side, moving your weight from one arm to the next.
For more comfort, you can put a rolled-up towel under your hand.
- Shoulder Table Punching Movement
You will use the top of a table and a water bottle for this exercise.
- Put a water bottle in front of you at arm's length.
- Then, make a fist with your bad hand and slide your forearm across the table to "punch" (or tap) the water bottle. Put and keep your forearm and elbow on the table. Make sure to keep both your elbow and forearm on the table.
- Put a water bottle in front of you at arm's length.
Also, try not to let the shoulder that hurts lift up toward your ear.
Putting your hand on the shoulder that hurts or using a mirror to watch how you move may help you keep your shoulder from lifting up.
It's okay if you can't help but lift the shoulder that hurts a little bit.
Trying still helps your brain figure out how to use those muscles again.
If you have trouble moving your hand over the table surface, try putting a towel under it to make moving easier.
- Shoulder Pushing
You will use the top of a table and a water bottle for this exercise.
- Set the water bottle out at arm's length.
- After clasping your hands together, hook the affected side’s hand around the bottle, and push it across the table as far as you can.
- Once you've moved the bottle as far to one side as you can, turn it around, hook the bottle on the inside of your hurt wrist and push it across the table.
- Set the water bottle out at arm's length.
Again, do your best to keep your shoulder down and your forearm and elbow on the table.
- Cane Slides
You will need a cane for this exercise.
- Hold your cane by both ends and raise it in front of you so that your arms are parallel to the floor. Turn your torso to the left and right while holding the cane out in front of you.
- Repeat this twist slowly back and forth, and move your eyes along your arms. As you keep stretching, you'll feel this twist get deeper and deeper.
- Repeat 10 times or more if you feel you can keep going.
- Hold your cane by both ends and raise it in front of you so that your arms are parallel to the floor. Turn your torso to the left and right while holding the cane out in front of you.
If you have trouble sitting still and keeping your balance, do this in a chair with arms or with someone else close by.
- Lateral and Circular Cane Stretches
- Sitting down, have the bottom end of the cane on the floor, and hold the cane at arm's length away from you and put the weak arm's hand on the handle. If you need more stability, put your unaffected hand on top of the weak hand.
- Now, lean forward while still sitting down. Then tilt your back. You should feel this stretch from your hips all the way up to your shoulders.
- Next, try moving your upper body in large circles while holding on to the cane. You can use the unaffected hand to move the weak side in a big circle.
- Repeat each exercise ten times.
Again, if you have trouble keeping your balance while sitting, you might want to have someone close by who can help you if you need it.
Takeaway
Shoulder pain after a stroke is very common. The reasons, while complex, are somewhat well-studied.
Shoulder injuries lead the way when it comes to the main causes of shoulder pain after a stroke.
What’s really important about shoulder pain after a stroke, is prevention. Prevention is doable and is key to a successful recovery.
With consistency and dedication, everyone can achieve a satisfactory recovery.
